Creating your first GUI (Graphical User Interface) in Roblox Studio might seem daunting at first, but with the right guidance and understanding of ScreenGui and Frame essentials, you’ll be building professional-looking interfaces in no time. This comprehensive guide will walk you through everything you need to know about GUI development, from basic concepts to advanced styling techniques.
Table Of Contents
Understanding GUI Fundamentals in Roblox Studio
GUI stands for Graphical User Interface, and in Roblox, these are the visual elements that players interact with on their screens. Whether it’s a menu button, a health bar, or an inventory system, all these elements are created using Roblox’s powerful GUI system. New to Roblox development? Start with our beginner’s guide first.
There are three main types of GUIs in Roblox:
- ScreenGui – Displays on the player’s screen like traditional menus
- SurfaceGui – Shows on a Part’s surface within the 3D world
- BillboardGui – Appears as a “floating” GUI above objects in the game world
For beginners, ScreenGui is your starting point since it’s the most commonly used type for game interfaces.
Setting Up Your First ScreenGui
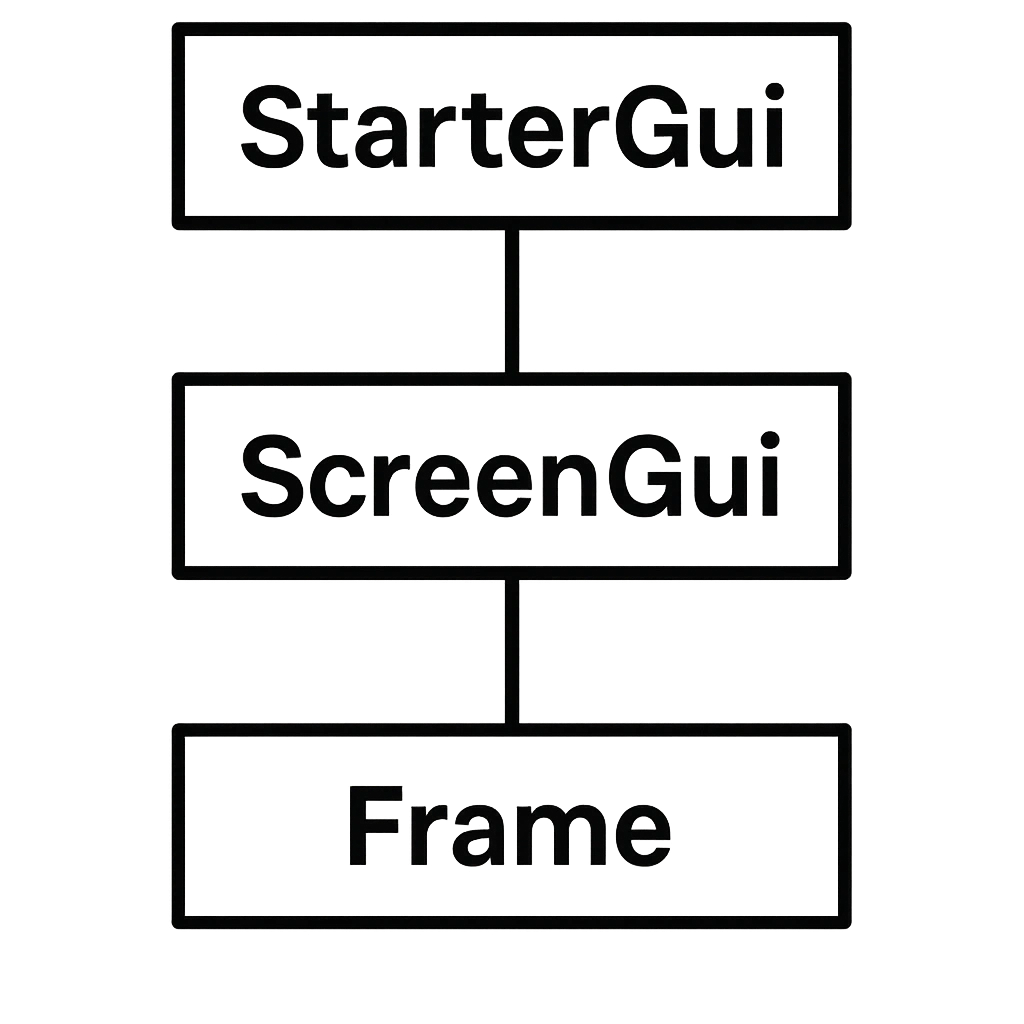
Before you can create any GUI elements, you need to understand the proper hierarchy structure. All GUI elements must be properly organized to function correctly.
The StarterGui Container
StarterGui is the essential folder where all your screen-based GUIs must be placed. This special container automatically replicates its contents to each player when they join your game. Think of StarterGui as the template that gets copied to every player’s screen.
To access StarterGui:
- Open the Explorer panel in Roblox Studio
- Navigate to View tab and click Explorer if it’s not visible
- Locate StarterGui in the game hierarchy
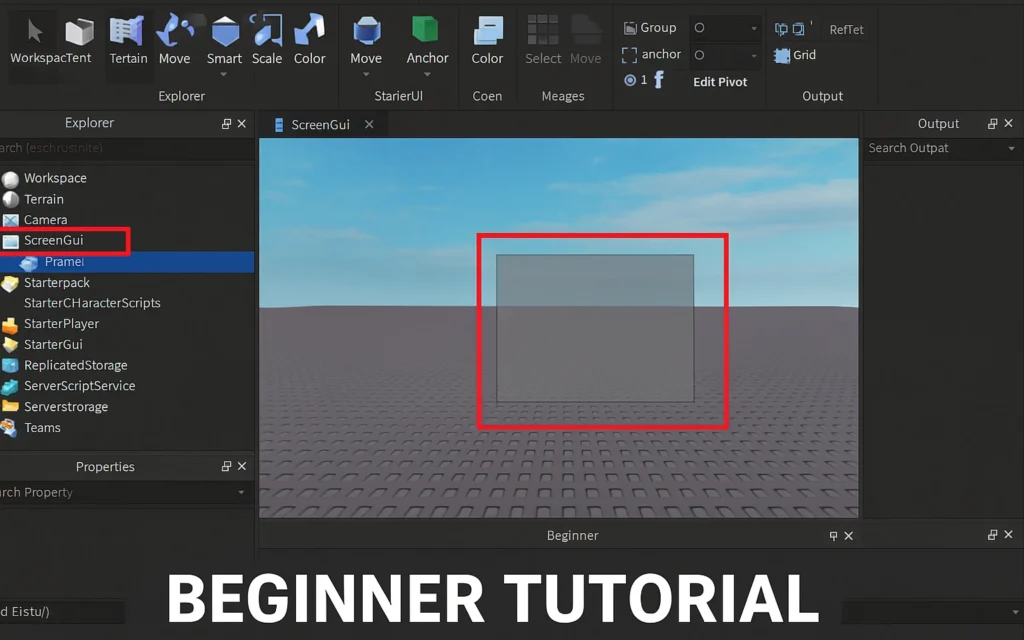
Creating Your First ScreenGui
A ScreenGui acts as the main container for all your GUI elements. You cannot simply place GUI objects directly into StarterGui – they must be inside a ScreenGui to display properly.
Step-by-step creation process:
- Right-click on StarterGui
- Select Insert Object > ScreenGui
- Rename your ScreenGui to something descriptive like “MainGui”
The ScreenGui has several important properties, including DisplayOrder, which controls the layering of multiple ScreenGuis. Higher DisplayOrder values appear on top of lower ones.
Mastering Frame Essentials
Frames are the backbone of GUI organization. They act as containers that hold other GUI elements together, making it easier to manage, position, and style your interface components.
What Makes Frames Special
Unlike folders, Frames are actual GUI elements with their own visual properties. This means they can have backgrounds, borders, and transparency effects while also serving as organizational containers. When you move a Frame, all elements inside it move together, maintaining their relative positions.
Creating and Positioning Frames
Basic Frame creation:
- Click the + button next to your ScreenGui
- Search for and select Frame
- The Frame appears in the top-left corner by default
Essential Frame properties:
- BackgroundColor3 – Controls the Frame’s background color
- BackgroundTransparency – Makes the Frame transparent (0 = opaque, 1 = invisible)
- BorderSizePixel – Sets the border thickness
- ClipsDescendants – Hides elements that extend outside the Frame boundaries
Understanding UDim2 for Positioning
UDim2 is Roblox’s coordinate system for GUI positioning and sizing6. It combines both Scale and Offset values:
- Scale – Percentage-based positioning (0.5 = 50% of parent size)
- Offset – Pixel-based positioning for precise control
Best practices for responsive design:
- Always use Scale values instead of Offset for cross-device compatibility
- Set AnchorPoint to (0.5, 0.5) for center-based positioning
- Use the Device Emulator to test on different screen sizes
Advanced GUI Styling Techniques
Working with Colors and Transparency
Color customization is crucial for creating visually appealing interfaces. The BackgroundColor3 property accepts RGB values, allowing for precise color control. For transparency effects, use BackgroundTransparency to create modern, layered designs.
Professional styling tips:
- Use UIGradient objects for smooth color transitions
- Apply UICorner for rounded edges and modern aesthetics
- Combine transparency with UIStroke for elegant borders
Managing Display Order and Layering
ZIndex and DisplayOrder control how GUI elements stack on top of each other. Within a single ScreenGui, use ZIndex to layer individual elements. For multiple ScreenGuis, DisplayOrder determines which appears on top.
Layering best practices:
- Use multiples of 100 for ZIndex (100, 200, 300) to allow for future insertions
- Set critical UI elements (like notifications) to higher DisplayOrder values
- Keep related elements within the same ScreenGui when possible
Incorporating Roblox Avatar Customization Elements

Modern Roblox games often include avatar customization features as part of their GUI systems. With the rise of UGC (User-Generated Content), players expect more personalization options in games.
Learn more about avatar styling in our fashion guide.
Trending customization features to consider in your GUIs:
- Animation pack selectors for movement customization
- Outfit preview systems showing different style combinations
- UGC item browsers with filtering and search functionality
- Fashion trend displays highlighting popular items and styles
Implementation considerations:
- Use ViewportFrames to display 3D avatar previews within your GUI
- Create ScrollingFrames for browsing large collections of items
- Implement search and filter functionality with TextBoxes and TextButtons
Implement marketplace features using our economy strategies.
Responsive Design for All Devices
Mobile optimization is crucial since approximately half of Roblox players use mobile devices. Your GUIs must look and function well across different screen sizes and aspect ratios.
Discover mobile-specific gameplay tips for better user experience.
Mobile-friendly design principles:
- Use Scale-based positioning instead of fixed pixels
- Implement UIAspectRatioConstraint to maintain proportions
- Test extensively using Device Emulator in Studio
- Consider touch-friendly button sizes for mobile users
Common GUI Patterns and Best Practices
Effective menu design relies on logical organization and intuitive navigation. Use consistent styling across all menu elements and provide clear visual feedback for user interactions.
Interactive Elements
TextButtons and ImageButtons are your primary interactive elements. Style them consistently and provide visual feedback through hover effects and click animations to create a responsive user experience.
Data Display
For displaying player statistics, inventory items, or other game data, combine TextLabels with Frames to create organized, readable layouts. Use proper alignment and spacing to guide the player’s eye through the information.
Conclusion
Building your first GUI in Roblox Studio using ScreenGui and Frame essentials opens up endless possibilities for creating engaging player experiences. Start with simple layouts, master the fundamental concepts of positioning and styling, and gradually incorporate more advanced features like avatar customization elements and responsive design principles.
Remember that great GUI design combines functionality with aesthetics. Focus on creating interfaces that are not only visually appealing but also intuitive and responsive across all devices. With practice and attention to detail, you’ll be creating professional-quality GUIs that enhance your game’s overall player experience.
The key to success is starting simple and building complexity gradually. Master these fundamentals, and you’ll have a solid foundation for creating any type of GUI system your game requires. For more advanced techniques, consider exploring the comprehensive guide.
FAQ
Q: What’s the difference between StarterGui and PlayerGui?
A: StarterGui is the template container in Studio where you create GUIs. PlayerGui is where these GUIs appear for each individual player during gameplay.
Q: Should I use Scale or Offset for GUI positioning?
A: Always use Scale for responsive design. Scale values (0-1) represent percentages of the parent container, ensuring your GUI looks consistent across all devices.
Q: How do I make a Frame with transparent background but visible borders?
A: Set BackgroundTransparency to 1, then use either UIStroke for borders or create custom border Frames inside your main Frame.
Q: Can I use both ScreenGui and Frame for the same interface?
A: Yes, you need both. ScreenGui is the container that makes GUIs visible, while Frames organize and style the visual elements inside.
Q: What’s the best way to test GUI responsiveness?
A: Use Roblox Studio’s Device Emulator to test different screen sizes and aspect ratios. Always test on both desktop and mobile viewports.
Q: How do I prevent GUI elements from overlapping incorrectly?
A: Use ZIndex for individual elements and DisplayOrder for entire ScreenGuis. Higher values appear on top.
Q: What are UGC items and how do they relate to GUI development?
A: UGC (User-Generated Content) items are player-created accessories and clothing. Many modern games include UGC browsers and avatar customization systems in their GUIs.